Smaller modular units are often handled by in-house maintenance teams. Larger, automated, or multi-line systems typically require manufacturer technicians or specialized contractors who understand the electrical and controls side of the job.
Get installation wrong, and the consequences show up fast: misalignment, safety hazards, premature wear, unplanned downtime, and sometimes a voided equipment warranty. This guide walks through the complete, correct installation process for conveyor systems, following industry best practices from planning through validation.
Key Takeaways
- Installation follows four phases: preparation, placement, integration, and validation testing.
- Confirm site readiness (space, floor load, utilities) and safety compliance before any equipment arrives.
- Skipping post-installation testing is a common precursor to delayed equipment failure.
- Partnering with an experienced manufacturer with strong after-sale support cuts long-term maintenance headaches.
Installation Guide for Conveyor Systems
Every conveyor installation, regardless of size, moves through four phases: preparation, placement, integration, and validation. What changes is scope and duration.
A simple single-conveyor setup can take 1-2 days, while a complex multi-conveyor cell with integrated controls can run 1-2 weeks, according to Dorner's modular integration guidance. Large, site-wide automated lines often extend beyond that, depending on the number of transfer points and control systems involved.
Expect to coordinate:
- Millwrights for frame placement and mechanical alignment
- Electricians for power and controls wiring
- Controls technicians for sensor calibration and automation integration
- Facility and engineering teams for structural sign-off and safety compliance
Prerequisites and Safety Considerations
Before any equipment touches the floor, confirm the site can actually support it.
Site readiness checklist:
- Available floor space and ceiling height for the conveyor's full footprint
- Structural or floor load-bearing capacity, especially for elevated or mezzanine-mounted sections
- Clearances around doors, columns, and existing equipment
- Confirmed power and utility access at the installation zone
Compatibility matters just as much as space. Match the conveyor's speed, capacity, and load type to actual production requirements, and verify it will integrate cleanly with equipment already on the line.
This is where modular, pre-engineered systems have an advantage. NEDCO's CV-500 conveyor line, for instance, includes speed-synchronization with connected E-Z Fold equipment, which removes the guesswork around matching throughput rates between stations.
Safety compliance is non-negotiable. OSHA's machine guarding standard requires protection against point-of-operation, nip-point, and rotating-part hazards on installed equipment.
Just as important, OSHA's lockout/tagout rule (1910.147) explicitly covers installation work itself; the standard defines this to include "constructing, installing, setting up, adjusting, and inspecting" equipment, all of which fall under energy-control procedures. That means lockout/tagout applies during the install, not just after the conveyor is running.
Don't proceed without:
- Finalized engineering drawings
- Confirmed power and utility access
- Verified structural support for the frame and any mezzanines
Tools and Parts Required
A conveyor installation kit is only as good as the drawings and bill of materials behind it. Still, most jobs draw from a common tool list.
Essential tools:
- Levels and chalk lines for marking center lines
- Torque wrenches for fastener specifications
- Alignment gauges for tracking checks
- Rigging or lifting equipment for heavy frame sections
Electrical testing tools become essential once controls integration starts, and overhead or multi-level sections almost always require lifting equipment beyond a standard pallet jack.
Core parts checklist:
- Frame sections
- Belts, rollers, or chains
- Motors and drives
- Sensors
- Guarding
Sourcing matched, pre-engineered components reduces compatibility headaches considerably. Manufacturers offering complete modular systems, such as E-Z Fold's finishing and packaging line conveyors, supply components designed to work together from the start, which cuts down on the trial-and-error that comes with mixing parts from different suppliers.
How to Install a Conveyor System (Step-by-Step)
Installation follows a defined sequence. Shortcuts in any phase tend to surface as bigger, more expensive problems later.
- Prepare the site. Clear the installation area, mark center lines with a chalk line, and confirm utilities are routed to the zone.
- Position and secure the frame. Level each section, check for squareness, and lag-bolt permanent conveyors to the floor to prevent shifting or toppling.
- Complete mechanical integration. Install belts, rollers, or chains, mount motors and drives, and attach supporting structures like mezzanines if the layout requires them.
- Complete electrical and controls integration. Wire control panels, sensors, and safety interlocks, then connect to plant automation systems.
- Perform initial configuration. Set belt tension, calibrate sensors, and align tracking before running any load through the system.
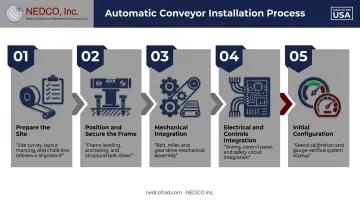
Each step builds on the one before it. A frame that's slightly out of level in Step 2 will show up as belt drift in Step 5, no matter how carefully the tracking gets adjusted later.
Post-Installation Checks and Validation
Once the mechanical and electrical work is done, validation confirms the system is actually ready for production, not just assembled.
Start with visual and structural checks:
- Alignment against original chalk line references
- Anchoring at every lag-bolted point
- Guarding properly in place at nip points and rotating parts
Then move to functional testing:
- Run a dry cycle with no load first
- Gradually introduce loads to confirm smooth, consistent operation
- Watch for steady tracking with no drift, quiet operation, and consistent belt tension
Noise, vibration, or sagging during this phase are red flags, not quirks to work around. Skipping this step is one of the more common reasons conveyors fail earlier than expected.
A misaligned belt or an uncalibrated sensor rarely causes an immediate breakdown. It wears down components gradually until something fails during a production run, at the worst possible time.
Common Installation Problems and Fixes
These issues show up most often during or immediately after installation. Catching them early is far cheaper than fixing them once the line is running full shifts.
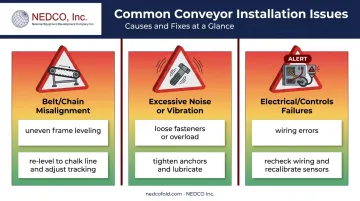
Belt or Chain Misalignment
Problem: The conveyor drifts off-center or tracks unevenly during operation.
Likely cause: Uneven frame leveling or improper initial tensioning.
Fix: Re-level the frame against the original chalk line reference, then adjust tracking and tension according to manufacturer specifications.
Excessive Noise or Vibration
Problem: Unusual noise or vibration appears shortly after startup.
Likely cause: Loose fasteners, insufficient lubrication, or a load that exceeds rated capacity.
Fix: Inspect and tighten all anchoring points, lubricate gear reducers and bearings, and confirm loads stay within structural and drive capacity limits.
Electrical or Controls Integration Failures
Problem: Motors or sensors fail to respond correctly during commissioning.
Likely cause: Wiring errors or mismatched control settings.
Fix: Recheck wiring against schematics, recalibrate sensors, and consult the manufacturer's technical support team for controls configuration. NEDCO customers can reach service contact Don Cranshaw directly by phone or email for hands-on troubleshooting help, rather than waiting on a third-party contractor's schedule.
Pro Tips for Installing Conveyor Systems Effectively
A few habits separate installations that go smoothly from ones that drag on:
- Schedule around production, not against it. Install during planned downtime and phase the work in stages to avoid disrupting ongoing operations.
- Account for the environment. Temperature, humidity, and dust or lint buildup affect component wear, especially in textile finishing or food production settings.
- Document everything. Maintain an installation checklist and get sign-off from safety and engineering teams before bringing the system online.
- Know when to call a specialist. Complex electrical or controls integration is where manufacturer-trained technicians earn their value. E-Z Fold provides direct manufacturer support and nationwide parts access to help minimize downtime on textile finishing lines.
Conclusion
Installation quality determines how a conveyor system performs, how safely it operates, and how long it lasts. Cutting corners during setup rarely pays off; problems surface later as downtime, safety issues, or premature wear that cost far more to fix.
Partnering with an established manufacturer matters here. E-Z Fold, made in the USA and family-owned since 1989, builds modular equipment designed to integrate smoothly. Its ongoing service support helps ensure conveyor systems run right from day one.
Frequently Asked Questions
How much does it cost to install a conveyor system?
Costs vary widely based on conveyor type, size, automation level, and site complexity. Get a quote based on your specific facility requirements rather than relying on a general estimate.
What does a conveyor technician do?
Conveyor technicians assemble, align, wire, and test conveyor systems, then maintain them to keep operations safe and efficient. This role typically falls under industrial machinery mechanics or millwrights.
What are the three types of conveyors?
Belt, roller, and chain are three common conveyor types used in production lines. Belt conveyors suit small or irregular items, roller conveyors handle cartons and totes, and chain conveyors move heavier unit loads.
How long does conveyor system installation typically take?
Small modular units can take just a few days, while large automated systems with integrated controls can take several weeks. Timeline depends heavily on complexity and the number of connected stations.
Can I install a conveyor system in-house, or do I need a contractor?
Smaller modular systems can often be installed by trained in-house maintenance staff. Complex or automated systems typically require specialized contractors or manufacturer technicians, such as NEDCO's service team, for the electrical and controls work.
What is the most common mistake made during conveyor installation?
Misalignment and skipped validation testing are the most frequent, costly mistakes. Both lead to premature wear and unplanned downtime that show up weeks after the system goes live.