Whether you're running a home sewing operation or managing a high-volume apparel production line, proper label attachment is non-negotiable. This guide covers where each label type goes, what tools you need, how to sew them on correctly, and which mistakes to avoid.
Key Takeaways
- Brand labels sit at the back neck, care labels at the left side seam, and size labels at the waistband or alongside the brand label
- U.S. law requires permanently attached care labels disclosing fiber content, country of origin, care instructions, and manufacturer identity — hang tags don't qualify
- The two core methods are sew-on (applied to garment surface) and sew-in (integrated into a seam during construction)
- Stitch type, thread quality, and label material must match the fabric — or the label will fail
- Bulk production requires measurement templates; eyeballing placement creates costly inconsistencies
Where to Place Clothing Labels: A Garment-by-Garment Guide
Label placement balances brand visibility, wearer comfort, and regulatory compliance. Each garment type has established conventions — and in some cases, legal requirements — that dictate where each label belongs.
Back Neck (Neck Seam)
The back neck is the standard home for main brand labels. The label is stitched into the middle of the inside neck seam, keeping it visible when the garment hangs on a rack or in a wardrobe.
This location also carries a legal obligation. Under FTC rules, garments with a neck opening must display country of origin on the front of a label at the inside center neck. That requirement can't be relocated to a side seam or elsewhere on a necked garment.
Side Seam
The left side seam, typically near the hip or hem area, is where care and washing instruction labels go. This is an industry convention — not a legal requirement — but it's widely followed across U.S. and European apparel production because it gives consumers a consistent, predictable place to look.
Hem, Sleeve, and Waistband
- Hem and sleeve locations work well for decorative brand patches and flag labels on t-shirts, sweatshirts, and outerwear — sleeve placement is especially visible for brand reinforcement
- Waistbands are standard for size information on pants, skirts, and shorts, often combined with care instructions on a single label
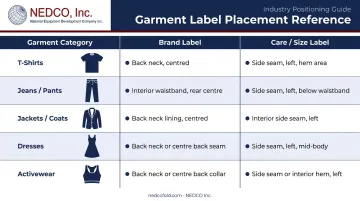
Garment-Type Placement Quick Reference
| Garment | Brand Label | Care/Size Label |
|---|---|---|
| T-shirts | Back neck | Left side seam |
| Jeans/pants | Back waistband | Left side seam |
| Jackets/coats | Back neck | Inner chest pocket area |
| Dresses | Back neck | Side seam |
| Activewear | Back neck or heat-transfer at neck | Left side seam |
For childrenswear and activewear worn directly against the skin, keep labels away from pressure points and consider softer materials or tagless constructions.
What You Need Before Sewing On Clothing Labels
The right prep prevents misalignment, puckering, and labels that detach after a few washes.
Tools and Materials
- Sewing machine (straight stitch and zigzag capability) or hand-sewing needle
- Coordinating thread — polyester preferred for durability
- Straight pins
- Measuring tape or ruler
- Fabric chalk or washable marker
- Scissors
- For iron-on labels: heat press or iron plus parchment/silicone paper
Label Type and Fabric Compatibility
Matching label material to fabric type affects how the finished label performs:
- Woven labels (damask, satin, taffeta): Durable and suitable for most fabrics. Damask offers the tightest weave and finest detail; satin has a shinier face; taffeta is more utilitarian with a matte finish
- Printed labels: Lighter and cost-effective, but may fade under high-heat washing; cut edges can fray without a heat-sealed finish
- Heat-transfer labels: Appropriate for smooth, heat-stable fabrics; stretch-capable variants exist for activewear, so match the transfer type to the specific substrate
For stretch fabrics (jersey, activewear), use a flexible stitch or a label specifically rated for stretch applications.
U.S. Compliance Checklist
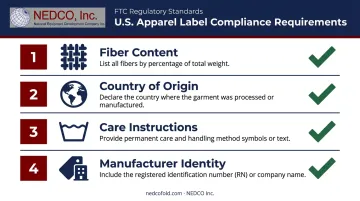
FTC regulations require the following on permanently attached labels for most U.S. apparel:
- Fiber content — generic fiber names listed by weight in descending order; fibers under 5% may be listed as "other fiber" unless functionally significant
- Country of origin — stated on the inside center neck label for any garment with a neck opening
- Care instructions — must remain legible for the garment's useful life; the care label is specifically required to be permanently attached
- Manufacturer identity — company name or FTC-issued Registered Identification Number (RN); an RN is optional if the business name is used
Enforcement is real. In 2015, Nordstrom, Bed Bath & Beyond, J.C. Penney, and Backcountry.com paid a combined $1.3 million in civil penalties for mislabeling rayon textiles as bamboo. Verifying fiber content before production isn't optional.
How to Sew On Clothing Labels: Step-by-Step
Before starting, confirm which method applies to your label type:
- Sew-on (stitching directly onto the garment surface) — suits brand and decorative labels
- Sew-in (integrating the label into a seam during construction) — best for care labels that need to last the garment's full life
Step 1: Mark the Position
Use a measuring tape and fabric chalk to mark the exact placement point. For symmetry at the back neck, measure from each shoulder seam to find center. For side seam labels, mark approximately 8–10 inches above the hem unless garment construction specifies otherwise. The garment should lie completely flat before you mark.
Step 2: Secure the Label with Pins
Pin the label to the marked position, confirming it lies flat with all edges aligned. For folded labels — loop fold or centerfold — verify the fold faces outward and both ends are correctly positioned before pinning into the seam.
Step 3: Sew Using the Appropriate Method
Sew-on (all four sides):
- Set sewing machine to straight stitch
- Sew along all four edges of the label
- Backstitch at start and end to lock the thread
- For a two-short-sides attachment (creating a hanging loop at the collar), sew only the left and right edges
By hand:
- Use a back stitch along each edge
- Keep stitches small and even for a clean finish
Sew-in (seam integration):
- Fold the label in half lengthwise with the fold facing outward
- Place both ends into the open seam between two fabric pieces
- Stitch the seam closed with a straight stitch, capturing both label ends
Step 4: Inspect and Finish
Check that the label lies flat without puckering at the corners. Trim excess thread close to the fabric. Gently tug the label to confirm it doesn't shift — if it does, your machine tension likely needs adjustment. In a production environment, this is the right point to build in a quality checkpoint before garments advance to the next finishing step.
High-volume operations running hundreds or thousands of units often move beyond manual attachment entirely. NEDCO Inc.'s Automatic Apparel Labeling System, for example, connects directly with folding machines, bagger/sealer systems, and conveyors — keeping labels consistent across every unit without manual handling.
Key Parameters That Affect Label Attachment Quality
Even with correct technique, four variables determine whether a label holds up through washing and daily wear.
Stitch Type and Machine Settings
- Straight stitch: Appropriate for stable, non-stretch woven fabrics
- Zigzag or stretch stitch: Required for knit and jersey fabrics — prevents thread breakage when fabric stretches
- Stitch length that's too long reduces holding strength; too short risks distorting the fabric around the label
Note: ASTM D6193-16(2025) classifies stitches and seams but does not prescribe specific stitch-length ranges or tension values for label attachment. Always validate settings on your actual label, garment, thread, and machine combination.
Label Fold and Orientation
Understanding fold types matters for proper attachment:
| Fold Type | Description | Typical Use |
|---|---|---|
| Center fold | Folded at midpoint; open ends captured in seam | Neck or side-seam insertion |
| Loop fold | Forms a loop; ends secured in seam | Neck seam where two readable faces are useful |
| Mitre fold | Ends fold diagonally at ~45°; creates tabs for attachment | Hanging neck-label construction |
| End/border fold | Left and right ends fold back; attachment through folded ends | Surface sewing, neck labels |
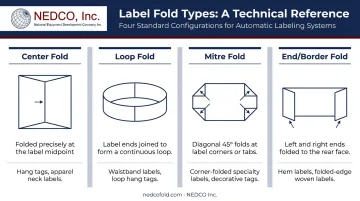
A loop fold sewn into the neck seam must have the fold oriented outward. Reversed orientation leaves the label facing backward against the garment.
Thread Color and Quality
Two factors drive thread selection:
- Color: Match the label's border color, or match the garment fabric if the stitching is visible on the face
- Material: Polyester thread outperforms cotton on durability and color retention through repeated washing. This matters for care labels, which must stay legible for the garment's full useful life under FTC requirements.
Common Mistakes When Sewing On Clothing Labels
Most label failures — labels that bunch, detach, irritate wearers, or look unprofessional — come from the same repeatable errors.
Skipping Measurement and Alignment
Placing labels by eye produces inconsistent positioning across a production run. On a rack or in packaging, crooked or off-center labels read as poor quality. For bulk production, use placement templates or jigs to maintain consistency unit after unit. Automated labeling systems go further, removing human placement variability from the equation entirely.
Using the Wrong Attachment Method for the Fabric
- Iron-on labels applied to coarse, textured, or stretch fabrics will delaminate
- Sewn labels on delicate or sheer fabric without stabilizer backing can cause puckering or tearing
- Heat-sensitive or waterproof membrane fabrics may reject both adhesive and standard sewing — and require specialized attachment methods
Always test on a sample before committing to a full production run.
Incorrect Tension or Stitch Settings
| Problem | Likely Cause | Fix |
|---|---|---|
| Puckering around label edges | Thread tension too tight | Reduce upper tension; test on scrap fabric |
| Thread loops or pull-out after washing | Thread tension too loose | Increase tension; re-test |
| Skipped stitches | Needle too fine for label thickness | Switch to a heavier needle |
| Distorted label edges | Zigzag stitch on stable woven label | Switch to straight stitch for woven labels |
Frequently Asked Questions
What are the rules for clothing labels?
In the U.S., the FTC requires most garments to carry permanently attached labels disclosing fiber content, country of origin, care instructions, and the manufacturer's name or RN number. The care label must remain legible for the garment's useful life. Rules vary by country — EU regulations require fiber composition and durable labeling but differ on origin and care requirements.
Why are labels always on the left?
The left side seam placement for care and size labels is an industry convention, not a legal requirement. It exists to give consumers a consistent, predictable location to find functional information. No FTC, ASTM, or AATCC standard mandates it — the practice is simply widely followed in U.S. and European production.
What stitch type is best for sewing on clothing labels?
A straight stitch works for most stable woven fabrics. A zigzag or stretch stitch is better for knit and jersey fabrics, where the thread needs to move with the fabric during wear rather than break under tension.
What is the difference between a sew-on and a sew-in label?
A sew-on label is stitched directly onto the surface of a finished or partially finished garment. A sew-in label is integrated into a seam during construction — folded with its ends captured inside the seam as it closes, which means it's only an option while that seam is still open.
Can I sew a label onto a finished garment?
Yes — the sew-on method works on finished garments and is common for brand patches and decorative labels. Sew-in integration requires access to an open seam, so it's only practical during garment construction.
How do I prevent clothing labels from irritating the wearer?
Choose softer label materials — satin weave or printed cotton — for close-to-skin placement. Confirm all cut edges are heat-sealed or folded under before attachment. For activewear and childrenswear, heat-transfer labels eliminate the label entirely from the skin contact zone.